
Practice Point: Pushups
Love them or hate them, pushups are a great way to develop strength in the upper body (including the chest, shoulders and arms). And although you might not encounter pushups much in yoga classes, think how much upper body strength is required for postures like arm balances or downward dog, or for everyday movements like pushing shopping trolleys, picking up things or reaching overhead.
This is another movement that can be incorporated into your daily life. Try a couple of air pushups, or pushups against a wall or bench, while you’re waiting for the toaster or the kettle! Or (as I discovered while photographing for this post), do a set of pushups to beat the three o’clock slump!
Before you begin ...
Choose a variation that feels comfortable for you. Pushups can strain your wrists, shoulders and in some variations, the spine, so take time to develop your strength before attempting another variation.
Warm up the upper body, particularly the arm joints and shoulders, before practising pushups. Examples are wrist and elbows bends and rotations, shoulder rotations, and pec stretches.
The practice
The variations I offer in class can be performed lying supine on the floor (or your bed), seated, or standing:
- Air pushups (probably better known as a chest press)
- Wall pushups
- Incline pushups
- Floor pushups from your toes or knees
Air pushups (Chest press)
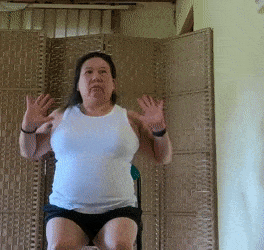
- Start standing or sitting, or lying on your back.
Feel that your spine is long, chest is open, and the shoulders relaxed.
- Place your hands in front of you at about chest level, and about shoulder-width apart. You might like to make fists or open the palms as if you're pushing against a flat surface.
- Let the elbows relax to the sides at about 45 degrees. Think of the elbows and the body creating an arrow-shape.
- Feel that the shoulders are down so there is no tension in the neck.
- Brace the abdominals and back. If you're upright, you might feel a gentle squeeze between the shoulder blades.
- Imagine that you're moving through water or pushing a heavy weight, and slowly straighten the arms out in front.
- Similarly, have that feeling of moving through water or pulling a heavy weight, as you slowly bend the elbows and bring the hands back to the body. Do as many as you feel comfortable with before coming back to your standing, seated or supine position.
Need more? Increase the intensity of this exercise by holding light hand weights or using a resistance band. To use a resistance band:
- Place the resistance band around the back of a chair or behind your back.
- Bring the ends under your arms and hold an end in each hand.
- Ensure that you maintain constant tension in the band as you push away and come back. (In the video, the band is a little too strong for me because I'm letting the band bring my hands back instead of controlling the movement.)
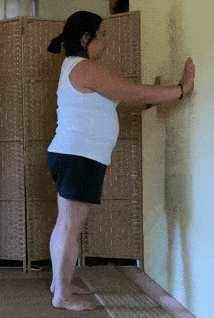
Wall pushups

- Stand with your feet a comfortable distance apart about arms' length away from the wall, and take another step back.
Alternatively, sit in a chair about arms' length away from the wall.
- Place your hands on the wall slightly wider than your shoulders and about the level of the chest.
Have the palms against the wall with the fingers spread wide, or make fists and place the knuckles against the wall.
- Let the elbows relax to the sides at about 45 degrees. Think of the elbows and the body creating an arrow-shape.
See if angling the fingers towards each other makes this more comfortable. - Feel that the shoulders are down so there is no tension in the neck.
- Let the elbows relax to the sides at about 45 degrees. Think of the elbows and the body creating an arrow-shape.
- Engage your abdominals and gluteal muscles to brace the body. Think of your body as one long line: the head, shoulders, hips and ankles in one line, and the spine long.
If you're sitting in a chair, engage the abdominals to brace the body; bringing the head, shoulders and hips in one line, and creating length in the spine.
- Slowly bend your elbows and, maintaining the line and length of the body, lower yourself towards the wall.
If you're sitting in a chair, come forward from your hips, maintaining the line and length of the body from the torso to the crown.
- Pause slightly at the end, and then push back to your starting position.
Tip: If you feel your elbows flaring out to the sides or tightness in the neck or shoulders, try repositioning your hands.
Taking the hands wider will put more load on the shoulders. Bringing the hands closer will put more load on the elbows.
Placing your hands higher up the wall will put more load on the neck and shoulders whereas bringing them lower will place more load on the wrists.
Need more? Increase the intensity of the exercise by stepping away from the wall or moving to an incline pushup.
Incline pushups

- Stand in front of a steady surface such as a bench, a table or a step.
For more intensity, choose a lower surface; for less intensity, a higher surface.
- Place your hands on the surface about shoulder-width apart, or hold the edge.
- With the arms straight, step back and engage your abdominals and gluteal muscles to bring your body into a straight line.
Ensure that your feet are a comfortable distance apart so that you feel steady and balanced.
- Bend your elbows and slowly lower your chest towards the surface.
- Pause slightly, and then push yourself away from the surface.
Tip: If you feel your elbows flaring out to the sides or tightness in the neck or shoulders, try repositioning your hands or feet.
Taking the hands wider will put more load on the shoulders. Bringing the hands closer will put more load on the elbows.
Stepping closer might bring more load into the wrists whereas stepping away might bring more load into the shoulders and neck.
Need more? Increase the intensity by choosing a surface at a lower height.
Floor pushups
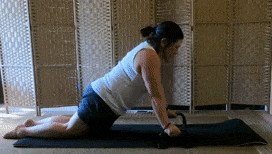
- Come onto your hands and knees on the floor.
Place your hands slightly wider than shoulder-width. You might like to:
- Place the palms on the ground with the fingers spread wide
- Make fists and place the knuckles on the floor
- Hold onto dumbbells or pushup bars (as I do in the video)
- Straighten your arms, move your knees back, drop your hips, and engage your gluteal and abdominal muscles to come into a half plank where your body is a straight line from your knees to the top of your head.
If you wish:
- Bend your knees to raise your feet off the floor, and pivot from your knees, or
- Straighten your legs to come into a plank where your body is a straight line from your heels to your head.
- Bend your elbows and slowly lower your chest towards the floor.
- Pause slightly, and then push yourself away.
Tip: If you feel your elbows flaring out to the sides or tightness in the neck or shoulders, try repositioning your hands or feet.
Taking the hands wider will put more load on the shoulders. Bringing the hands closer will put more load on the elbows.
Something different
- Tricep pushups
- For tricep pushups, the elbows are kept close to the body.
When performing tricep pushups, position the hands so that the fingers are facing up the wall or forward, or if making fists or using pushup bars, the palms are facing each other.
- Japanese yoga pushups
- The Japanese Yoga pushups use different hand positions. They're generally performed from a table top position (hands and knees) and involve bringing the weight forward to lower the chest between the hands. The different hand positions can also be used for air and wall pushups.
- Start in table top on the floor, standing arms' length away from a wall, or in a standing, seated or supine position for air pushups.
- Do a set of pushups with your hands positioned so the fingers are facing up or forward. If you're making fists or using pushup bars, have the palms facing towards each other.
For air pushups:
- Position the hands about level with the chest, have the elbows bent and close to the body.
- Imagine you're moving through water and slowly straighten the arms out in front of the body.
- Pause, and then slowly bend the elbows to return to the starting position.
For wall pushups:
- Position the hands about level with the chest.
- Keeping the elbows close to the body, bend the elbows and lower your body towards the wall.
- Pause, and then push away from the wall.
For floor pushups:
- Bring your weight forward and, keeping the elbows in towards the body, lower your chest between your hands.
- Pause, and then push yourself back into table top position
- Do a set of pushups with your hands positioned so the fingers are facing towards each other. If making firsts or using pushup bars, have the palms facing down towards the floor or back towards your knees.
For air and wall pushups, bring the hands to about chest level.
As you bend your elbows, the elbows will come out to the sides in line with your wrists. -
Do a set of pushups with your hands positioned so the fingers are facing out. If making fists or using pushup bars, keep the hands in the same position with the palms facing each other.
For air and wall pushups, bring the hands down to about waist level.
- Do a final set of pushups with your hands positioned so the fingers are facing towards your feet. If making fists or using pushup bars, have the palms facing up or forward.
For air and wall pushups, bring the hands down to about waist level.
Benefits
Strengthens the upper body including the chest, shoulder and arms
Improve posture
Wall, incline and floor pushups can also help strengthen the muscles in the torso (ie. your core muscles)
References
3 Upper Body Mobility Exercises That’ll Have You Doing More Push-Ups Than Ever, Rachel Lapidos, Well + Good
7 Science-Backed Benefits of Doing Push-ups, Katrina Eresman, GoodRxHealth
Can’t Do Pushups? (JUST DO THIS), Video, Redefining Strength
The Anatomy of a Push-Up: Exploring Proper Push-Up Form and Techniques, Annie Malaythong, NASM